

All 3 panels have been covered and are ready to be hung on the wall to create our extra large headboard so today's job was to make scatter cushions for the bed.
My first two cushions were to be made out of the raw silk and I had made up my mind to trim them with a piped bias trim made out of the same fabric I am to make my Roman blind from.
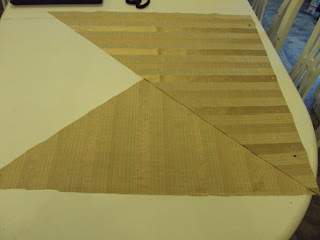
First let me tell you I hate making bias trim, in the past I have cut a perfect square, taken it from corner to corner to make two triangles and cut the fabric down the middle and then measured the width of my trim from the long edge and then cut my strips and sewn them together.
I have read about making a continuous bias tube to create the trim and found the following instructions on You Tube.
I made my square, then placed the two triangles as demonstrated


Specialist bias binding gadgets are available in a variety of sizes, however because I wanted to use this for a piped trim, I just folded my trim around my cord (recycled from some old Venetian blinds - it wasn't particularly thick, so I doubled it up) and using a zipper foot, stitched as close to the cord as possible.
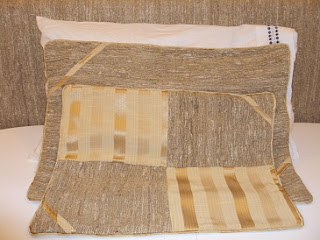
Now for making the scatter cushion. I have stayed in quite a few nice hotels around the world, and always try to take inspiration from these beautiful places. Rather than make square cushions, I wanted to make pillow shaped cushions but slightly smaller than the one's I sleep on to give a sort of reducing size look.
I cut two pieces of the raw silk to the desired size. I wanted more than just the bias trim on these cushions so decided to use some of the bias trim, and make a narrow strip to create a strip to go across the two boarders.


My first two cushions were to be made out of the raw silk and I had made up my mind to trim them with a piped bias trim made out of the same fabric I am to make my Roman blind from.
First let me tell you I hate making bias trim, in the past I have cut a perfect square, taken it from corner to corner to make two triangles and cut the fabric down the middle and then measured the width of my trim from the long edge and then cut my strips and sewn them together.
I have read about making a continuous bias tube to create the trim and found the following instructions on You Tube.
I made my square, then placed the two triangles as demonstrated

Next stage is to stitch the two pieces together using a 1/4" seam and then press open.
Mark along the long edge of both triangles a line for the required width of the trim. It is important you do this because you will use these lines as a guide for when you form the tube. The YouTube clip shows this quite well but here is my tube below which has been stitched using a 1/4" seam again and press open.

Once you have your tube its a good idea to mark the cutting lines and putting your hand inside the tube, cut round and round until you have cut the whole tube.

and look how much bias trim you get - this is so much easier.

Now for making the scatter cushion. I have stayed in quite a few nice hotels around the world, and always try to take inspiration from these beautiful places. Rather than make square cushions, I wanted to make pillow shaped cushions but slightly smaller than the one's I sleep on to give a sort of reducing size look.
I cut two pieces of the raw silk to the desired size. I wanted more than just the bias trim on these cushions so decided to use some of the bias trim, and make a narrow strip to create a strip to go across the two boarders.

To make sure that the placement of the trim was the same for the two corners I placed 3 pins in my cutting board, placing the corner of the fabric into the corner pin and then lined the diagonal strip in line with the two other pins. To match the opposite corner up, I just turned the fabric around, and repeated the process again and stitch close to the edges.
The next stage is to attach the piped bias trim. With the cushion front, right side up, raw edges together place the piping trim with the piped edge on the inside and pin in place. The starting point will be in the middle of one of the longest sides (I found the middle by folding in half and placing a pin as a marker). Leave approximately 2" of trim overhanging the marker point and then pin to the front of the cushion front.

In order for the piping to sit nicely around the corner you need to clip to the stitching line at a slight angle as in the photograph..

Once you have pinned it all the way round, stitch as close to the piping as possible., making sure that the corner is well out of the way when you sew around the corner. When you reach the starting point, ensure there is enough piping to over lap, unpick some of the stitching, trim the cord back so the two cords butt up together, fold the end of the bias strip under and wrap around the starting point and continue stitching.

You will then get the result below - a nice neat finish.

The front is now completed so the next stage is to insert a zipper into the back. Cut a piece of fabric the same size as the front (I used the same fabric I used on the back of the headboard), fold in half lengthways and press. Take your zip and place in the centre, and mark with pins just after the top of the zipper and the bottom of the zipper. Using the crease line as a guide for the edge of your machine foot, sew a box as shown below. Cut along the centre creased line and cut into each corner as shown.

Press the edges under along the stitched line, and then position your zipper underneath and right-side facing, pin and stitch in place and then press.

First unzip the zipper and then right sides together place the cushion back and the cushion front together, pin and then using your fingers as a guide to find the piping, stitch the two fabrics together, once again stitching as close as possible to the piping again. Press,trim and turn right sides out.
Here is the finished article x 2.

I wasn't quite sure what I wanted to do for the 2nd set of cushions, but I tried a little experiment and came up with the following - here you can see the headboard, with the white pillow then the 1st cushion followed by the 2nd cushion.

Just need to order my Roman Blind kit to finish the bedroom.
More later.....................................
Very stylish! I mus admit having had loads of cream throw pillows on my bed, they've all ended up living in the corner of the room down the side of the wardrobe because they bug me.
ReplyDeleteRuthie I agree with you, I do the same for the ones here in my cottage when I throw them off the bed to go to bed, but they do look nice too, and come in handy if you are not feeling well and need extra pillows to prop you up.
ReplyDeleteThat is an ingenious way to cut bias strips.
ReplyDelete