

Today we collected the materials we needed to make our covered headboard.
6mm MDF; 1" foam; staple gun; fabric; glue; backing fabric; wadding.
Having made a headboard for my bed in the cottage I wanted to do the same for the flat in London. I knew I wanted a natural fibre for the front facing fabric and found the perfect natural fibre - pure silk. This was an absolutely great find - more pricey than my normal £1 a metre but still a bargain at £10 a metre.
This is how we made the headboard.
I purchased the foam and the MDF from the same place and got them to cut it to size for me. 3 sheets of MDF measuring 6' x 2' each, and 3 sheets of 1" thick foam also 6' x 2'.
1. Place 1 sheet of the MDF flat on a table and spread with glue (probably not as much as my D Mike was spreading all over but he was having fun - what can I say!


3. Cut a piece of wadding slightly larger than the board and form large enough to wrap around and staple underneath.


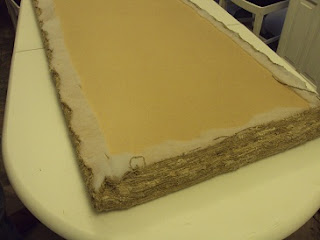
7. Trim away excess wadding and fabric, but making sure all edges are held fast by the staples.

8. The next stage is to tidy up the back of the headboard. Use a firm fabric - there is specialist materials for this purpose that can be bought in upholstery shops , but I found a firm woven curtain fabric and it was only £1 a yard so I used that instead. Cut the fabric slightly larger than the board, allowing enough fabric to turn in the edges. Stretch the fabric slightly, and while keeping the fabric tight, secure the top and bottom edges first and then fold the fabric under and staple. This gives a nice clean finish.


9. Finished section.

10. For our headboard it will be made up of 3 identical sections that will sit horizontally one above the next. 2 finished one more to do tomorrow as we are babysitting our beautiful granddaughter tonight.
More tomorrow.........................
6mm MDF; 1" foam; staple gun; fabric; glue; backing fabric; wadding.
Having made a headboard for my bed in the cottage I wanted to do the same for the flat in London. I knew I wanted a natural fibre for the front facing fabric and found the perfect natural fibre - pure silk. This was an absolutely great find - more pricey than my normal £1 a metre but still a bargain at £10 a metre.
This is how we made the headboard.
I purchased the foam and the MDF from the same place and got them to cut it to size for me. 3 sheets of MDF measuring 6' x 2' each, and 3 sheets of 1" thick foam also 6' x 2'.
1. Place 1 sheet of the MDF flat on a table and spread with glue (probably not as much as my D Mike was spreading all over but he was having fun - what can I say!

2. Place Foam on top of the MDF board

3. Cut a piece of wadding slightly larger than the board and form large enough to wrap around and staple underneath.

4. Smooth the wadding over the foam and then flip the whole lot over ready to staple to the board.

5. Stretch the wadding enough to wrap it around foam and board - be careful not to rip the wadding. Using a staple gun staple the centre of each edge first - wrap the corners and staple and then continue until secure. We purchased an electric staple gun for this because on a project as big as this you do tend to use a lot of staples and the electric gun makes it slightly easier - however a basic staple gun will do the trick.

6. Using the fashion fabric, follow the same procedure as above, but now wrapping around, board, foam and wadding. Periodically check that the fabric has not been pulled out of shape. There are distinct lines on our fabric as it is a loose weave, so we wanted to be sure that we didn't distort the fabric.


8. The next stage is to tidy up the back of the headboard. Use a firm fabric - there is specialist materials for this purpose that can be bought in upholstery shops , but I found a firm woven curtain fabric and it was only £1 a yard so I used that instead. Cut the fabric slightly larger than the board, allowing enough fabric to turn in the edges. Stretch the fabric slightly, and while keeping the fabric tight, secure the top and bottom edges first and then fold the fabric under and staple. This gives a nice clean finish.


9. Finished section.

10. For our headboard it will be made up of 3 identical sections that will sit horizontally one above the next. 2 finished one more to do tomorrow as we are babysitting our beautiful granddaughter tonight.
More tomorrow.........................
Gorgeous! Very luxe.
ReplyDeleteThanks Bunny - all your projects inspire me so much - when I get to your standard I will be very happy.
ReplyDeleteThe major thing I always admire about all your projects is the finishing touches. I would not have thought to finish the back side of the board.
ReplyDeleteYou and Mike are such a team! We should send you on that television show, the Amazing Race.