Tuesday, 29 November 2011

My Knock Off lace twin-set completed

Do you remember me posting a photograph of this set from the Madeleine fashion range of this lace cardigan and matching lace top.  The two pieces cost 10p short of £170.


Last week I traced around a RTW cardigan and made this sort of wearable muslin (which I have worn for work) and it looked lovely on (sorry nobody around to take a picture of me).


So I wanted to do the same cardi again, but the black lace one above is clearly longer, so I added 2" to the length of the body and this is what I have come up with.


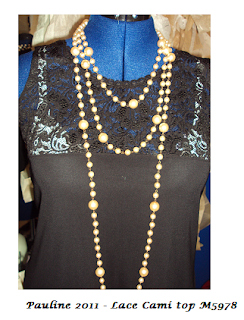
Above are the two pieces together, and left just the cami top on its own made using McCalls 5978.

Needless to say I will not be wearing a white bra like Edna.

I didn't have enough lace to make both the cami and the cardi completely from lace, so found a nice black knit that works really well with each other.

For the neck edge of the cami top, and the sleeves of the cardi, I used an elastic lace.  This was serged on to the cami neck edge, right-sides together, and then top-stitched using a conventional machine.  I also used the same method on the sleeve edges.  It wasn't used for its elastic properties, but more for the lace edge.


The original cardi called for a self bias trim, so using my now very popular continuous bias binding method I took a 6" square to create some bias trim out of the same lace used for the cardi.

I serged it, right sides together round the area required - from the first front point left front, round the back neck edge to the second front point.  I then gave myself a marker on the serger foot, used that as a guide and serged the raw edge before turning it under and top stitching using my Bernina giving this result.


Again following the RTW example, I serged a rolled hem for the bottom edge of the cardi.

I found some cheap pearls - not white (they are at the flat) but it gives an idea of the final look.

You may recall that the first thing I made from this black lace was my Jalie 2905 which will also work well with the lace cardi, especially for those colder winter nights when a sleeveless cami top with lace cardi may well be still a little cold.

The three items cost less than £10 so quite a saving from the original items.

So that completes another item on my to do list. Next month I am flying to Dubai for work, but will be going to the Burj Al Arab hotel for a special dinner.  This is one of Dubai's most famous hotels, so I need to look as good as I can.  I am really thinking about wearing my twin set, I have some fab black shoes I bought in Macy's a few years ago, so I now need to decide if I make a skirt or an evening pair of pants to go with the twin set.

Burj Al Arab


  I did manage to complete another two squares for Alana's quilt today, and I have found some pretty lemon cotton that will be perfect with the white but that will have to wait for when I post up the finished item.

Time for bed and a couple of pills to kill this sore throat.

More later...................................


Monday, 28 November 2011

Weight Loss Monday's - another successful week


I am pleased to announce another loss this week of 1 1/2 lbs.  I think the gods are being a little stingy considering the amount of cycling I did last week.  I cycled every day between last Monday and this morning which totalled approximately 9 hours exercise for the week, some of it really difficult and got me quite out of breath, especially today. But we did eat out quite a bit last week, so I shouldn't be too surprised, however I need to keep positive - its a loss, in the downward direction which is good.

I still need to lose another 22lb to reach my target, needless to say it will not happen over night,so I just need to patient.

More later....................


Sunday, 27 November 2011

A rare chance to relax


I just had to put a post up about my lovely weekend with my D Mike. Because we had plans to go to the theatre and meet up with work colleagues (past and present) on Saturday night, we didn't go back to the cottage, but spent our first weekend in London together.

Mike had to go to Frankfurt for the day on Friday, and sadly didn't get home until late Friday night, so our weekend kicked off with a nice leisurely morning. We are very lucky in that we have a fantastic artisan bakery just 5 minutes away and they sell the best bread in the world, in particular sour dough bread. Mike dashed off to purchase some bread while I put the kettle on for tea. Once back the bread was cut and popped into the toaster.......... Hmmmmmmmmmm delicious.

Now the flat contains a lot of glass - glass worktops, glass walls, and lots of big glass windows. When I was out exploring on Friday I saw a janitorial supplies shop, so I suggested that we take our bikes and see if we can buy some industrial size blue cleaning rolls, and window rubber squeegee, and some of those micro fibre cleaning clothes that are really great. Now we only have two small fold-up bikes, and the smaller items went into my bag ok, however Mike had to carry 6 x giant size paper rolls (poor thing) - however we did laugh all the way home.

The next couple of hours were spent cleaning windows inside and out, mopping floors before we set off for the theatre to see Rock of Ages. It was a very funny light hearted show which we both enjoyed and as most of the songs are from the 1980's I seemed to know all of them which only goes to show that the 80's were a focal point in my life. We left the theatre and went direct to the pub where we were meeting all my work colleagues and then on to the restaurant for dinner - end of day one, which we both thoroughly enjoyed.

Today we had what we both call a "faffing" morning - tea and toast in bed, looking out our favourite blogs and web sites, and more important searching out our local pubs and restaurants for a traditional Sunday Roast. Ironically we found somewhere right on our doorstep, somewhere that we have walked past and never given a thought of going into called Medcalf  in Exmouth Market. We had a fabulous meal and have added this to an ever growing list of restaurants we now love to go to.

To finish our day off we went to see the Immortals.  Not for everyone I guess, but we enjoyed it.  We found a couple of Boris bikes right outside the cinema, and hopped on them and was home in just 5 minutes. I love my little cottage in the country, but I am blown away at how much you just have on your doorstep living in London.  Go to the cinema from the cottage involves a car ride to the cinema, trying to find somewhere to park and then the drive home.  Today's adventure was a 15 minute walk to the cinema and a 5 minute bike ride home, mostly down hills.............fab.

I think that I can speak on behalf of both of us.  This was like a mini weekend away, enjoying what London has to offer but still able to enjoy the comforts of home.  Thanks Mike I had a lovely, special weekend.

Back to the cottage tomorrow morning, looking forward to seeing my beautiful little granddaughter tomorrow and getting on with some sewing.

More later...................


Friday, 25 November 2011

Day off - time to indulge in some cycling and shopping

I had booked today off so I went off exploring on my bike.

My first trip was to one of my old haunts Leather Lane Market.  I found one of those book stalls that sell the magazines that have just gone out of date, I managed to buy an Australian smocking magazine which not only gave me loads of inspiration, it also had free patterns inside, an Instyle magazine and a slimming magazine.  All three magazines had a retail value of over £10 but I managed to get all three for 1.50.  Just as I was about the leave I saw a great cook book from River Cottage on vegetarian cooking.  I have been following the TV series and been inspired by some of the recipes he has made, so couldn't resist the book.


I wont bore you with the great value fruit and veg that I bought, but you will be interested in the little stall selling some wonderful fabrics ranging from £1 a metre to £3 a metre for some silk organza.  I spent £20 in total and bought 1 metre of the silk organza, 2 different types of knit (I can see another Jalie top in the making), some grey pinstripe to make some trousers and some 2 way stretch lace in both white and cream, very wide and only £1 a metre, so I bought 3 metres of each colour because it is a really good for underwear, stretch tops etc.


I then cycled on to Dalston Market and found the silver grey and black charmeuse that you can see on the right for only £1.50 per metre and the white cotton you can see at the top of the picture on the right.  I need more of this to continue embroidering my little squares for Alana/Ella's quilt.


Just so you can see the pattern on the silk organza I have opened it up over of the sofa - This will make a top with some lovely sleeves.

Last but not least, I stopped off at a sewing supplies shop nr Dalston Junction and purchased some interfacing, zips, elastic and and thread to keep here at the flat.


All in all I had a lovely day, mooching around, under no pressure of time, and didn't have to worry about upsetting anyone because I was taking too long, and I have managed to wash everything except for the silk organza and the white cotton.


Last but not least, I found quite two cool websites.  The first is called Embroidery Library Projects  and the other was Wild Ginger  For any of you that do machine embroidery take a look at these.  Lots of tips, free software and projects.

So that was my day.  My D Mike has just got home from Germany so time to cuddle up and watch TV.

More later.........................................

Monday, 21 November 2011

Weight-loss Monday - anything is better than nothing


I am pleased to say that I have lost something, but sad to say it was only half a pound.  Last week I did loads of cycling, with Tuesday being the only day that I didn't cycle but my scales were not shifting too much.

Still onwards and upwards.  The cycling is getting easier, even if the weight loss isn't.

More later..........................

Knock off cardi and more embroidery

My Janome 350e embroidery machine seems like it hasn't stopped all weekend, firstly I was embroidering my squares for my sampler quilt on Saturday and then I was doing cute little squares for something, yet to be decided for little Alana, or even possibly for Alana and Ella to share when they come to visit.

Today was no exception - I had purchased a fleece for my D Mike and needed to embroider that so I decided on a nice dragonfly design followed by a slogan that means something to IT geeks, but I am sure you could use it in many other instances.

Now in a previous post I had mentioned that I wanted to make a lace cardi .  I have several of the waterfall cardi patterns, but generally they seem to have far too much fabric.  I had purchased a very cheap little cardi, which I guess because of the cheap price, the cardi was not overly generous in fabric, which in some ways I prefer, so I decided to use this as a template to make my own pattern from the cardi.
I turned the cardi inside out, folded it in half and then traced off the back section first - simple.  I took the key points i.e sleeves and neck curves by pinning it around and then marking the paper with some dots and then using my tailor's curve to shape the neck edge and the sleeve

I folded the paper in half and folded one of the sleeves in half and traced the sleeve off on the fold, again pinning around the curves and marking the paper with dots.  I pinned out the front section too and did the same thing.

The pattern had been created without any seam allowances, so I had to remember to cut these out with a 5/8th seam allowance.

Sewing this couldn't be simpler - sew front sections to back - stitch using serger, attach sleeves, then sew up sleeve and side sleeves.

The original had a bias trim fixed to the front and neck edge, so using my continuous bias binding method I made some binding from the fashion fabric and attached that in the same way, and for the bottom hem I used my serger to sew a rolled hem, and here is the end result

I am so pleased with the this- the original black cardi was in a fine light-weight cotton knit - my fabric was slightly heavier but has pretty much come up exactly the same and this will be my wearable muslin.

So my test run has worked out fine, however because I used the lace to make a turtle/polo neck sweater, when I laid my pattern on the lace, I don't quite have enough of to make the cardi completely from lace.

I am not defeated, I can't buy any more of the lace because I had the last of it, so I may use the lace for the front and sleeves and use some plain black for the back and put in a lace insert.  This will now be a project for the weekend.

More later................................

.


Sunday, 20 November 2011

Lost ankle/foot, cycling, thrift shops and a creative flair

For a long time now I have been wanting to make a wall hanging for the flat and yesterday afternoon was the day.

Earlier my D Mike and I had a wonderful morning out on our bikes.  First we cycled to the sewing machine shop where I purchased a spare ankle for my Husqvarna sewing machine.  I am shocked at how expensive this tiny spare part is.  Let me tell you how I lost it.  Last year I was fortunate enough to receive a fabulous Bernina sewing machine for Christmas, and the lady in the shop said that she would give me an adaptor so I can insert the Husqvarna ankle into the Bernina adaptor and use many of the feet that I purchased for the Husqvarna.

Of course I experimented to see that it worked etc etc.  During the summer, we moved into the flat and I transported my Husqvarna up to London to live there so if I wanted to sew I could.  Last Tuesday I had finished everything on my Roman blinds except for one velcro tape for the 6' bedroom window.  I got the machine out ready to sew, there was a needle but no ankle or foot.  I had to stitch the velcro on by hand but more important what the heck had I done with the foot and ankle.

Back home, I found all the Husqvarna feet in the my special box, but no Bernina adapter and no ankle for the Husqvarna.  So I bought two ankles (one for the Husqvarna and one for the Bernina adapter), a new Berniana adapter, and just for good measure a pack of needles total bill £34 .................................  You all know that now I have purchased these, I will of course find the lost items.

Back on our bikes we headed into a pretty little village on the river, predominately to get a spare bolt fixed on my bike (yes I know not have a good week am I) and to purchase some black cotton to make a wall hanging.

I parked the two bikes and my D Mike at a table outside a coffee shop and went into have browse, safe in the comfort that he was drinking a tea and relaxing while enjoying the beautiful sunshine we were experiencing.  I found my black fabric and some great fabric with bikes on which I am using as a key piece for the hanging.

I have wanted to make myself a pressing board for ages - seen lots of them on YouTube etc., but you ideally need a nice old wool blanket (something we don't have in my house any more).  There are a couple of thrift shops near the cafe, so I left mike for a few minutes longer to see if they had anything.  Sadly they didn't, but what I did find is some great pure silk ties which I will cut up for bias binding.


We left the cafe with all my purchases, cycled to the bike shop but on route passed a Farmer's Market.  So once the bike was fixed (took 1 minute) we back-tracked and mooched around the indoor market and left with a brace of pheasants and some goats cheese and milk.

We started to head back home, and just before we reached home, I saw another thrift shop, so pulled in and yippee they had a blanket - 100% wool for £2.50.  I purchased the blanket, which was huge and they stuffed it into a plastic bag for us which Mike thankfully hung off his handle bar because out front bags were full up.

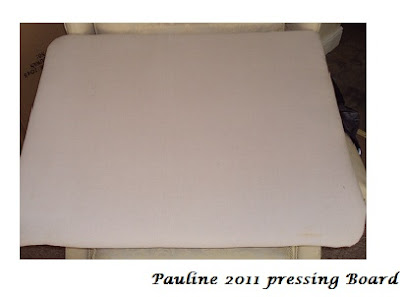
When we got home I got out the staple gun we purchased to make the covered headboards (knew it would be handy), got two large boxes, measured enough of the blanket to cover the boxes with a double thickness, and then wrapped the whole lot in an old sheet and here is my pressing board.


Its not too heavy, but works really well.  I have enough of the blanket to cover my ironing board and the rest I put in the washing machine on as hot a wash as I could find, and then put it into the tumble dryer to create a sort of boiled wool.  But that is another project and another day.

So now on to the creative bit.  In October 2010 I went to the Houston quilt show and was very inspired and  purchased a template from Sue Pelland called leaves galore.  I wanted to try out the template, and make a wall hanging, and wasn't too sure what I wanted to do, so I guess what I am about to show you is a first attempt really of a mixture of patchwork, quilting, appliqué and machine embroidery.

The square bottom left has been made up using the petite leaf shape, the middle square has been used using the left-over bits of fabric after you cut out your leaves and the top right is just using the 4 leaf shapes.

The quilted embroidery design I actually purchased, however I found loads of links offering free downloads such as Bunnycup Embroidery where some really cute designs to make things for our darling grandchildren plus Sue Box Creations where I found some free items and purchased some great butterfly designs which I want to use on some organza.  I am amazed at how many free items you can find on the internet - Google is your friend ha ha.


As a first attempt I am quite pleased with the quilt/wall hanging - will I put it up -Hmmm I am not sure - really wanted more of a picture rather than a quilt - but I have backed this with a lovely soft cotton fleece so if Alana or Ella come to visit us and wants something to cuddle this will be nice and warm.

I was keen to try out some of the new embroidery designs and here are the first two I embroidered last nigh while I was sewing the patchwork (this is a benefit of having  a separate embroidery machine):

There are lots more to choose from, these two both took approximately 30 minutes each to embroidery.  The Mouse had 8 colours and the duck had 5 colours.  I have the Janome 350E embroidery machine which so far I have found great.

Last but not least, around midnight last night I cut out some 6" squares of black, white and my cycle print fabric and then cut them again to produce this set of squares below - I am sure there is a name - perhaps pin wheel - would need look it up.  Was sort of experimenting again, so will keep it and think about what I want to do with it. 


So all in all we had a fabulous day yesterday - my thrift shop purchases were a great find for me, but also more important, the money I spent went to a good charity, while finding a new life in some discarded items. The bike ride was really enjoyable, good for the environment because we didn't use our car, great for the hips, hopefully I burned a few extra calories and more important we had a really fun morning (I speak for Mike too.......................... well except for when he was try to balance the plastic bag with the blanket in on the way home ha ha)

Ok need to press on the day is young and I have lots more to do. More later.........................................


Tuesday, 15 November 2011

Blinds completed and hanging

Thank goodness - I have not only finished the blinds but now got them hung as well.

I was pleased I managed to line up all the stripes especially as the blinds were all hanging next to each other - the pink tinge is from the light/camera the true colour of the blind is the same as the kitchen blind.

The kitchen blind is fake, doesn't go up or down but fits in with the others as the flat is open plan.


I also managed to finish the last cushion see above.  Lots of my friends call me Paul, and the 2011 is to remind us when we moved in. Below are the other two cushions in location together the purchased cushions.  And last but not least the covered headboards, scatter cushions and blind for the bedroom.


Hooray - I can now get on with some nice me sewing on Friday, however I am giving the bedroom a little more thought - too much of the silk on the bed, so may have to make another couple of cushions perhaps like the embroidered and patchwork ones.

More later.....................................


Monday, 14 November 2011

17:15 hours and still no blind kits - but 2 new cushions

I was really hoping my blind kits would turn up first thing this morning so that I could get going on the last bit of work I need to do - but the gods were not looking down favourably on me today, and I got a text saying they estimated my delivery to arrive between 16:00 - 19:00 hrs.

With my plans scuppered, I decided it was time to first tidy up my sewing room before I started anything else.  Sadly this took me much longer than anticipated and I didn't finish until midday.

My creative juices were flowing today and I wanted to make some cushions for the lounge out of the blind fabric, but I didn't want just striped cushions.  First I made up some more bias binding using the continuous bias binding method again to use on the cushions.

The first cushion I made incorporated some machine patchwork.  I took a 6" square of my striped fabric, cut it diagonally corner to corner to create 4 triangles, I then went top to bottom and left to right to make the triangles even smaller (I am sure there is a name for this in the patchwork quilting world but I am not sure what it is called).


I rearranged the triangles to create what I thought was a pleasing shape and sewed them together to create a strip.  I took my striped fabric and sewed a larger piece to the right and a smaller piece to the left giving me the square of my cushion.  Next stage was to stitch the corded piping to the front of the cushion-front clipping the piping with a V  at each corner to persuade the piping to turn neatly.  For the back of my cushions I used velcro tape but you could use a zip if you prefer.    Right sides together, stitch the cushion front and back together.  I used my zipper foot for this to get as close as I can to the piping.

I didn't want all my cushions to look the same so I needed to think of something different for the next cushion.  For this one I cut a few strips of the striped fabric and stitched them together, staggering the colours to create a chequerboard effect.  I then cut 4 strips of the gold stripe and created a boarder for the chequerboard.

I cut out my two squares of fabric for the cushion size and duplicated the back for the velcro closure.  I wanted to overlay the chequerboard over the middle of the cushion front, but rather than mess around turning my edges under, I used a very light-weight lining fabric and stitched 3 of the sides, right-sides together, turned and pressed, leaving only one side left to press under.  I chose to hand stitch the chequerboard to the cushion front.  Once this was completed, I still wanted to do something else, so thought some embroidery would look nice.  I found a thread to match the blue and the gold and created this.


So the question I am asking myself is do I make a 3rd cushion.

More later............


Weight Loss Monday - no change


Well perhaps I should change this weekly post to "weight stay the same Monday'" -  because that is what the scales tell me this morning boo hoo, still at least I didn't put anything on.

I did do more exercise last week,  I managed to do about 3 hours of cycling so I guess that was what helped mitigate the damage for eating out a few times together with some bad chocolate moments when I was feeling stressed out trying to get several spreadsheets changed for my boss which had me working from 7:30am - 11pm with only a 2 hour break and guess what, the conference call where I needed to present the spreadsheet was cancelled ahgrrrrrrrrrrrrrrrrrrrrrrrrrr.

While I have never been a fan of smoking, and don't have any intention of  starting, I do sometimes envy those smokers I see huddled outside smoking their cigarettes to cope with their stress, in the full knowledge that they are not gaining pounds.  However, of course I know the health benefits to smoking is even worse - but you get my drift, I am just bitching because I haven't seen the scales move this week.

Still undeterred, I start another week with much better intentions.

A cup of tea, low calorie breakfast and then get myself upstairs to do some nice "me" sewing to encourage me to stay on track.  Just hope my blinds turn up early so I can finish them as soon as possible.

More later.............................

6 Blinds in one day phew......................

Well I did it.  I sewed 6 Roman blinds in one day.  I am typing this at a stupid hour 20 minutes past midnight, I have a stiff neck where I have been hunched over my sewing machine, but I did it, and I need to unwind a little before I go to bed.

Sadly I ran out of tape (the tape you sew from left to right and thread the cord through to pull the blind up and down), but as soon as my kits arrive tomorrow morning, so will the much needed tape.  Fortunately I only need to sew the tape onto two of the blinds, but I do have to sew the Velcro to the top of all the blinds, but that is a 10 minute x 6 (approx 1 hour job).  So I guess I have about 2 hours work tomorrow and then I have finished them all and they can go up to London for fitting and I can tick another job off my list.

So I need to take myself off to bed and think about what I am going to sew for myself next.  Ideally my next item will incorporate some piping so I can use my new foot, and my new found technique to produce my own piping so watch this space.

Good night, more later..................................

Saturday, 12 November 2011

Corded Piping - something old, something new

A couple of weeks ago blogged about the scatter cushions I made to match my headboard and Roman blind for the bedroom in the flat.  For these I used some old Venetian blind cords and some of the Roman blind fabric to make some corded piping.

This is only about the 2nd time I have made my own corded piping, and was eager to make some finer piping to go into some clothing projects.

I popped into my sewing machine shop to pick up a part's pamphlet so that I can give some Xmas/birthday present hints for my kids.  They always ask me what I want, and to be frank, some Madera thread for my embroidery machine or accessories for my sewing machine is always a welcome gift however big or small.

While I was waiting for the shop mechanic to find a price list for me I was browsing the sewing machine feet and looking in particular for a piping foot.  I found what I was looking for, it was a little bit more expensive than I was expecting £30 to be precise, but undeterred, I decided I just to have one, and I am really pleased that I bought it.

When I finished the Roman blind earlier today, I came downstairs to cook tea and I then sat down to watch some TV, and typical of me, at 10pm I decided to go upstairs and find an old tie and use it to make some corded piping.

I have read about using ties before, especially if you can find some nice silk ones, and they often turn up in charity shops or jumble sales.  For my mini test project I found one of the kids old school ties that had been sitting in the wardrobe upstairs for the past 9 years.  I opened up the back seam and used one of the pressed edges to run my 4mm cord down.

The piping foot has a channel cut out of it, which sits nicely over the fabric and the cord.  You need to move the needle to the left to get the stitches as close to the cord as you can and here are some pic's of my sample piece.

There is enough fabric in the tie to make another 2 lengths of piping.

I took my fabric and stitched 5/8" from the edge using a long stitch to give me a placement mark for the piping.

Still using the piping foot I then sewed the piping to the right side of the fabric using the tacked marks for a guide - I guess you could use a air soluble pen too.  For the corner I clipped little V's to make sure it went round ok.

Next take the 2nd piece of fabric and right-sides together sandwiched the corded piping in-between and  once again use the piping foot to stitched close to the cord.

I haven't pressed any the sample I made here, but you can see the results are not too bad.


I have ordered a larger amount of 4mm cord from ebay £9.99 for 80mtrs so I can use up my scraps of fabric, or if I can find some nice silk ties in a charity shop, to make decorative piping to insert into projects.  I have found a nice Jean jacket pattern which I think may accommodate some decorative piping - I just need to go through my stash to find the right fabric for it.

Well time for bed, so more later.................................. 


Friday, 11 November 2011

Vogue 8731 completed

 I mentioned the other day that I had cut out Vogue 8731 and tonight I managed to finish it.

I used a light-weight grey cotton knit - as usual from my beloved Walthamstow market for the usual price of £1 a metre.

The only alteration I made to the pattern was an upper sleeve width where I added an inch.  I used the Palmer Pletsch instructions, however I found this link which is quite useful if any of you are looking for some instructions. increase upper sleeve width I haven't put it to the test but looks the norm.

The pattern called for a bias tape to finish the neck edge of this tunic top, but I decided serge the neck, sleeves and hem using a short stitch to give a good cover.  For the sleeves and the hem, I turned these under to create a half inch hem and then used my sewing machine to stitch it into place.  The serging added some stability and weight to the fabric while being quick, easy and gaviving a nice neat finish.
For the neck edge I was a little undecided.  I didn't want to use a bias tape that would show through the fine fabric so my initial thought was to serge the neck edge and then turn it under, but I decided to leave it as the finished edge.

I have put this over Jalie 2805 which I blogged about last weekend and I think it works well.  I guess this was really designed as a summer top, but the polo/turtle neck makes it suitable to wear during what is starting out to be a mild winter.

Will I make it again ? Yes probably it was quick, easy and comfortable to wear and I think a few bits of costume jewellery will transform this tunic for different occasions.

I need to start on my Roman blinds to finish them all before Lewis goes up to finish the remaining things at the flat.  Unfortunately by the time I ordered the kits last night, of course I missed the next day delivery slot, and it seems that I will not get them until Monday.

Fortunately I do have some of the tape used to guide the cords through the blind, so I should be able to make a start on these tomorrow.

More later............................. 

Thursday, 10 November 2011

Roman blinds again..................

I have just ordered anther 5 Roman blind kits from Terrysfabrics.  I bought the fabric a few weeks ago and have even used some of the bedroom fabric to make a bias binding trim for my scatter cushions for the bedroom.  I have booked tomorrow and Monday off so I have a long weekend, so needless to say I need to get this done as quickly as possible.

My son/builder is coming up on Tuesday to do some last bits and pieces for us here, including hanging our headboards and I will use this as an opportunity to get him to drill the holes for the Roman blind tracks.

I had a bit of a problem with my kitchen window.  It is very wide, and the widest blind kit I could purchase was about 20" too short.  I didn't really want to use two kits on the one window so decided to make a fake blind as it is unlikely 10 floors up, that I am likely to want to shut this particular blind.

While I think I have got the knack of sewing these blinds now - its boring and not my favourite thing to do, but will be satisfying to do the last few finishing touches for the flat.  I also want to do an embroidered cushion, that means  something to my D Mike and me, but not necessarily to the outside world (yes don't tell anyone I am a bit of an old romantic at heart).

I started my V8731 top just before I left for London this week.  I have selected the full-length sleeve version and just need to finish the hems and the neck edges so will post this as soon as I finish.  This was another really quick project, and it looks lovely on Edna, I just hope it looks as nice on me too.


More later...........................................

Tuesday, 8 November 2011

Damp day for cycling today & PR

Well I am back on my bike this week, I did several bike trips yesterday amounting to approximately 90 minutes in total, and again today totalling approximately and hour, so a good start to the week.

I am quite proud of myself cycling in the UK in November.  I confess the weather is still quite mild, and I do get quite hot when I am cycling, so it is nice not to feel like I am going keel over from the heat.  This morning when I changed in the office restrooms, my legs were quite pink from the cold, and a little damp because I didn't wear my protective trousers, but I really felt refreshed, but more important, hopefully busting those calories and reducing my hips.

I have to make reference to a  fantastic Jacket I saw on Pattern Review today the Jalie 2008 Lined parka  created by Joy.  Click her name to see her blog showing this jacket.  I have only just found Jalie and been really really impressed, and her rendition of this jacket has set me thinking whether or not I can create something suitable for cycling with my bike.

The biggest challenge will be finding the fabric which may take a time to find what I need, it has to be suitable for maximum visibility on my bike. I would also need to shape the back similar to other biking jackets.

More later...................................

Monday, 7 November 2011

Weight Loss Monday + 1lb (bad week)


Well I knew that if I didn't do any exercise that I couldn't expect to lose any weight, and indeed I put on 1lb this week.

I was a little lax last week - first I wasn't on my bike because I had to drive the 120 mile round trip to work last week so there was 0 exercise.

Yesterday I cooked a massive Sunday lunch - slow roast belly of pork with all the trimmings, followed by courgette cupcakes to have with a cup of tea in the afternoon - they were too good, plus M Darling Mike loves smoked mackerel pate which is made with double cream to be eaten for supper....................I know I know, too many excuses and I will be taking my bike out today to make up for all this so hopefully I can work extra hard this week and have a much better result for next Monday.

Lorraine Kelly is starting her Real Woman's little black dress diet this week so perhaps this website will dish out some good ideas and recipes.  Also they showed a picture of Dawn French   an English comedienne who has lost about 4stone in weight - she looks fabulous.  So lots to keep me motivated, just need to stay focused on the end goal.  As Ann from Everything Sewing said we both want to enter a SWAP (sewing with a plan) competition but not sure how to do this.

I have the day off today, so intend on doing some sewing too I have cut out a Vogue pattern which I want to try and make up today, between going to the dentist, having my nails done (a rare treat for me) dropping my car into the garage for some repairs and eventually cycling to the train station to get up to the flat.

As always more later.......................................

Sunday, 6 November 2011

New look blog.

I was playing around with my blog settings, and before I knew it, I had a new look to my blog.

Blogger has made a whole lot of changes, and I only clicked here and there to see what would happen and before I knew it I had changed the whole layout. I initially panicked, and then tried to reset it to how it was before, and well, what can I say, its gone and its too late in the evening for me to work out how to change it.

So here we have it - it is what it is for now, but it may change tomorrow

As usual, more later...............................................

Saturday, 5 November 2011

Jalie 2805 ideal in lace for Christmas parties

I love the Madeleine fashion range and they have picked up the lace theme like all the other designers and I really love this particular look. 


Having successfully completed my first Jalie 2805 I kept thinking this would look great in black lace with either a nude underlining or a black camisole underneath.  You know sometimes when you go out near to Christmas and want to look a little glamorous, but its getting cold, exposed shoulders are only going to get covered up with a shawl, so I think this is the perfect compromise - a sexy lace turtle/polo neck.


I have already mentioned before how quick this top is to make, I would say it takes just over an hour from start to finish, made entirely on the serger, and I think it worked even better with a textured fabric rather than a plain knit and here is the result of my hour's work. Below on Edna with some pearls.


Here you can see I used the edge of the fabric for the cuff end of the sleeve - I wanted them long and sheer - I think that it worked out well.


I have some more of the black lace left over, and have some plain black knit in my stash (somewhere) which I would like to use to make the same top with a plain back and front and just the sleeves in lace.


Sadly I didn't get as much sewing done today as I wanted - we had to go looking at washing machines, fridge freezers and tumble dryers with my daughter.  I also have  9 for lunch tomorrow, so decided to prep the veg, and make some cakes to cut down on the amount of work I need to do tomorrow.


Hopefully I can get a quick project done before they all turn up - if I can find the black knit in my stash, while I have the black in my serger it will save me rethreading the serger.


More later................................

Thursday, 3 November 2011

Yummy new WW recipe - Mushroom Stroganoff


I have been looking at this recipe for some time now and decided to cook it for supper tonight - delicious.

This was so quick to cook, and my daughter's ex-army partner and myself ate this tonight and we both really enjoyed it ------ another low fat WW recipe to add to my portfolio to help me shed these extra pounds.

My D Mike is back from Germany tonight and I can't wait to see him tomorrow, but this is one that I will have to cook for us when you get back :-) ............... when I am on a diet he has to be on one too, ha ha.


Average rating:
3 out of 5 star rating(21 ratings)
Creamy mushroom stroganoff is one of our favourites and we know your family will love it too. The paprika and Dijon mustard give this dish a real kick!
  • Serves: 4
  • Prep time: 5 mins
  • Cooking time: 20 mins
  • Total time: 25 mins
  • Skill level:
  • Costs:
Creamy mushroom stroganoff

    • 350g tagliatelle
    • 1tbsp olive oil
    • 1 small onion, chopped
    • 1/4 red pepper chopped .............this is my addition
    • 75g button mushrooms*
    • 150g white closed cup mushrooms, sliced*
    • 150g large flat mushrooms, sliced*.............* I only had closed cup mushrooms and these worked fine
    • 1 clove garlic, crushed
    • 2tsp ground paprika
    • 3tbsp dry sherry*...............................* didn't have any sherry so used vermouth
    • 1tbsp tomato puree - didn't use.
    • 2tsp Dijon mustard..................*substituted with French mustard - worked really well
    • squeeze of lemon juice* ............ *didn't have any so left it out.
    • 150ml half fat crème fraiche*................*substituted with low fat cream cheese works well for any creamy sauces.
    • 2tbsp chopped fresh flat parsley*...........*didn't have any so left out, but sure it would add some colour
    I more or less followed the recipe here

    1. Bring a large pan of water to the boil. Add the tagliatelle and cook for 10mins or according to packet instructions until just tender.
    2. Whilst the pasta cooks make the sauce: Heat the oil in a large frying pan, when hot add onions the mushrooms and sauté for 5 mins over a high heat until golden brown. Add the garlic and paprika cook for 30 seconds stirring.
    3. Add the sherry, puree mustard and lemon juice, stir and cook for about 30 seconds, stirring. Stir in the crème fraiche and cook over a gentle heat until piping hot. Season to taste. Make the replacements made above if like me you didn't have all the ingredients.
    4. Drain the tagliatelle and divide between four bowls. Top with the mushroom mixture and scatter over the parsley.
    More later....................................